Second Site, Same Shed: A Realistic Guide to Relocating a Garden Building
Photo: Carlquist, Sherwin John, 1930-2021, CC BY 4.0, via Wikimedia Commons
There's a particular kind of optimism that comes with buying a shed from someone else's garden. It's cheap, it's already built, and it looks perfectly solid in the listing photos. Then you arrive with a friend, a flask, and a vague plan, and realise the thing is heavier, floppier, and more attached to its base than you'd bargained for. Moving a garden building is rarely impossible. It is, however, a job that rewards an hour of thinking before you reach for the drill.
This isn't a guide to shifting a brick outbuilding or a fully insulated garden room with a fused supply and a tiled roof. Those are specialist jobs. What follows is for the ordinary timber shed or small workshop — the sort of thing that went up in a weekend and can, with care, come down in one too.
First, work out whether it's worth the bother
Before you plan a route, give the building an honest once-over. A free shed is only free if it survives the trip. Press a screwdriver into the bottom of the corner posts and the base rails; if it sinks in easily, the timber has had it and you'll be moving a skeleton rather than a shed. Check the roof covering. Felt that's brittle and cracked will not thank you for being lifted, and a replacement roof is an extra cost worth factoring in before you commit.
Look at how it's put together. Tongue-and-groove panels on a proper frame can generally be dismantled and rebuilt. Thin overlapping boards nailed directly to a skeleton are more fragile, and OSB panels — common on cheaper buildings — tend to crumble at the edges once the fixings come out. If the shed is a budget model that's spent five years under a dripping tree, the kindest thing may be to leave it where it is and put the money towards a new one.
Walk the route before you touch a screw
Measure the narrowest point between the shed and the road, not the widest. That means gates, side returns, plant pots, the rotary line, and the neighbour's fence that you've been meaning to talk to them about. A standard garden gate is often around 900mm, which is fine for panels but not for a assembled 8x6. If the only way out is through the house, you're dismantling it — no debate.
If a trailer is involved, check the approach. Can you reverse to within a sensible distance, or will you be carrying panels 30 metres up a gravel drive? Is there a low branch or a cable overhead? And is the trailer actually rated for the weight? A 6x4 shed is not heavy in the grand scheme of things, but wet timber, a damp base, and a trailer with a light nose weight can make for an unpleasant journey. Strap everything as though it's trying to escape, because at 50mph it will try.
Take it apart properly, and label as you go
Dismantling is where most moves are won or lost. Remove the door first, then the glazing, then the roof covering. Felt comes off in one piece if you're lucky and in frustrating strips if you're not; either way, don't drag it across the frame. Take the roof boards off next, then work down the panels, keeping the fixings in a tub rather than scattered across the lawn.
Label everything. A pencil mark on the inside face of each panel — 'front left', 'back right' — takes seconds and saves an afternoon of head-scratching at the other end. Photograph the frame before you lift the panels away, particularly if there's a brace or a noggin you'll need to put back. Keep the screws and nails in labelled bags; they're cheap to replace but annoying to match.
Bracing is the step everyone skips
A shed frame without its panels has all the rigidity of a stack of ladders. If you're moving a building in larger sections — or moving it whole across a garden — screw temporary diagonal braces across the corners. A length of 2x1 timber and a handful of screws will do it. Brace across the doorway too, or the opening will twist and the door will never hang straight again.
If you're sliding the shed rather than carrying it, don't push against the panels. Push against the base or the corner posts, and use rollers — lengths of scaffold pole or thick dowel — rather than dragging it across the grass. Dragging will rip the base off, and you'll spend the rest of the day wondering why the floor bounces.
Manpower, lifting, and the bit where someone hurts their back
Four people is the realistic minimum for a shed move; six is better and eight is a crowd. Use lifting straps or slings rather than fingers under the base. Lift together, on a count, and put it down together. If you're carrying panels, carry them upright where possible, or two people to a panel with one at each end and the panel on edge. Flat panels flex; on-edge panels behave.
Don't lift in the rain, and don't lift when you're tired. Most shed-move injuries happen on the second trip, when everyone's stopped concentrating. Take a break, drink the flask, and treat the last panel with the same care as the first.
Re-setting it on a base that actually works
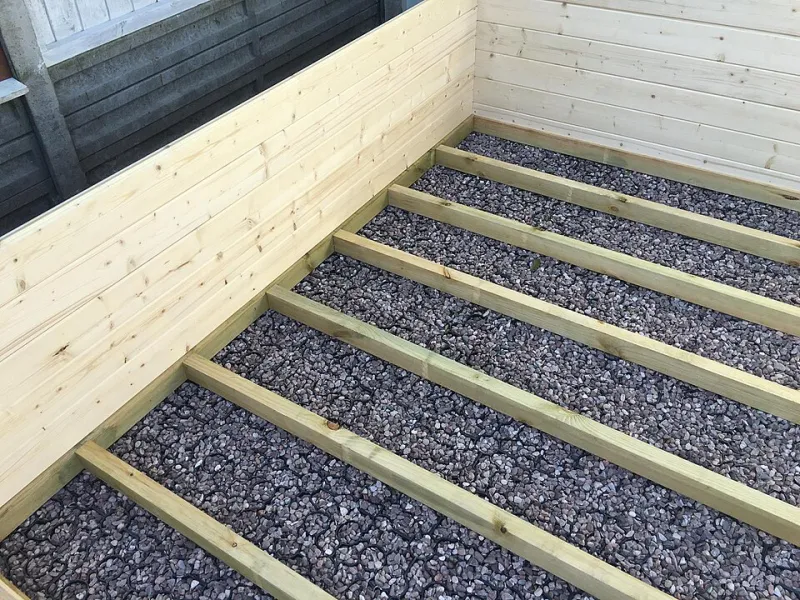
A shed that was level on its old site will not be level on a slope just because you're impatient. Prepare the new base first — paving slabs on a compacted sub-base, a timber bearer frame on blocks, or a proper concrete pad if you're doing it once and doing it properly. Leave a gap between the shed base and the ground for airflow, and make sure the bearers run the right way to support the floor joists.
Reassemble in reverse order, checking square as you go. Measure the diagonals of the frame before you fix the panels back on; if they don't match, the shed is racked and no amount of screwing will fix a twisted door. Refit the roof covering on a dry day, and give the whole building a coat of preservative once it's settled. It's had a stressful week.
The mistakes that turn a shed into firewood
Lifting by the roof. Dragging instead of rolling. Skipping the braces because 'it'll be fine'. Forgetting to check the route until the shed is already on the trailer. Reusing old felt. Rebuilding on bare soil. And the classic: deciding halfway through that it would be quicker to just carry the whole thing, frame and all, and discovering that a shed is essentially a large wooden parallelogram with a mind of its own.
Take your time, label everything, brace the frame, and budget twice the manpower you think you need. A shed that arrives in one piece and goes back together square is a bargain. One that arrives as a pile of splintered panels is a lesson. The difference is usually a couple of hours of preparation — and a friend who's willing to hold the other end.